
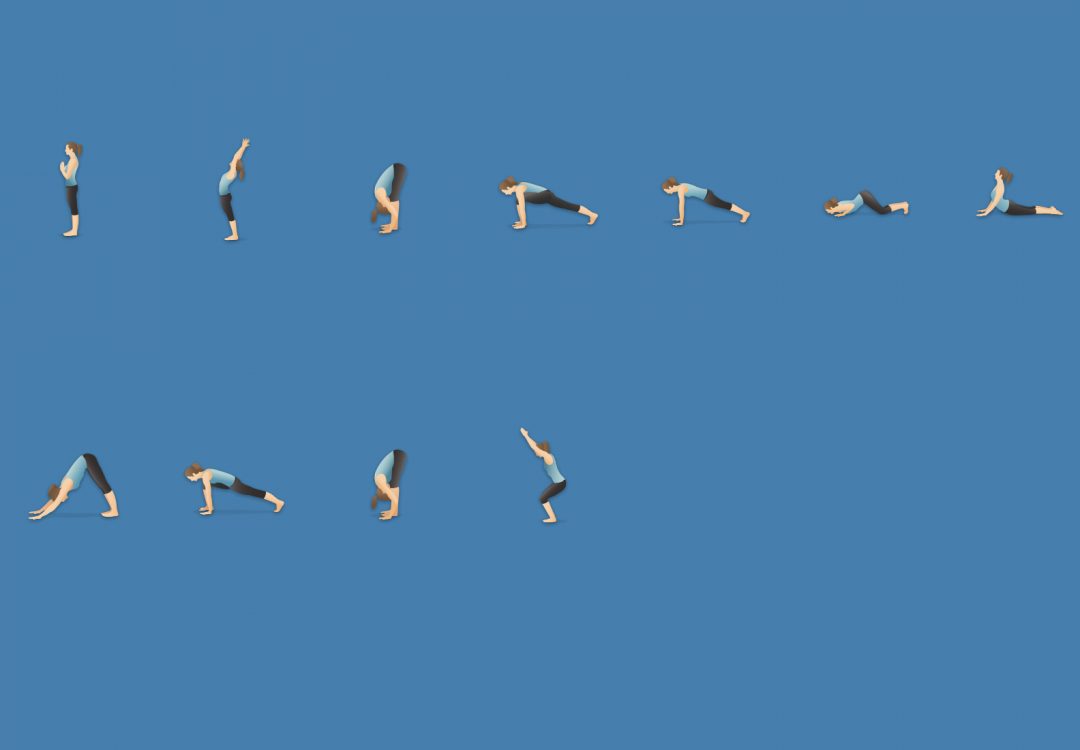
Sun Salutation (Surya Namaskar) is one of THE foundational sequences of postures in the yoga world. Being so foundational, you would think it would be taught in every yoga class everywhere, along with all the other wonderful asanas to try. But this most critical yoga sequence is so very foundational that most teachers don’t actually teach it. Even more surprising, is that through 500 hours of top notch yoga certification training, I did not see it discussed. Why? The sequence is considered so foundational that everyone you encounter from yoga teachers at the gym to professional teacher trainers assumes that you already know everything about it. As a result, not many people are all that well versed in this most important yoga sequence.
In reality, the people who really need to be working this sequence hard include everyone from serious athletes to spiritual seekers. But it helps to know everything that goes into it and everything you can get out of it. I spent the last few months ramping up how many rounds of this sequence I can pull off in one session and studying every detail of how it is put together, and how my body, energy and mind responded. What I found was incredibly surprising and has made this sequence my go-to daily workout. Here is why.
The key with this series is repetition. Don’t just do it once. Do it at least 11 times, and up to 108 times for those of you who like a challenge. For serious athletes seeking workout recovery, body balancing, proprioception, precision mindset and some calorie burn to boot, you can manage 30 rounds in 15 minutes at the end of your normal workout. For spiritual seekers, you can slow it down, take your time, and really make it a meditative and mindful practice that balances your energies beautifully. More on all of those benefits in a moment.
Let’s start with how this sequence is put together. The brilliant way this sequence is put together is rarely appreciated. The Surya Namaskar sequence, or Sun Salutation, is a set of 12 yoga postures designed to flow conveniently one into the next. But the choice of postures also ensures that you get both extension and flexion in both the upper and lower body, as well as between the front and back of the body. Every part of the body is flexed and extended at some point, right down to the fingers and toes. The sequence is perfectly balanced in every plane of the body: front to back, left to right and top to bottom. It works the entire body in a flowing and balanced way.
Many yogis make this sequence their own by adding in an extra posture here and there to adjust for their own preferences. That is why, if you google this sequence, you will find illustrations that show minor variations. All of them get the job done. Just pick one and make adjustments for yourself as needed. That being said, keep the baseline poses that are common to all of them and add, don’t subtract.
Surya Namaskar also works the breath. With each posture, you are either breathing out or breathing in. This forced self-regulation of breath is relaxing, and reduces cortisol levels, despite the fact that you are sweating and breathing hard. Small details and precision in the postures are important here. For example, when in the lunge posture, it is important to have the front knee slightly to the side, in the arm pit, not in front of the chest. Why? Nadi Shodhana.
Nadi Sodhana is a form of breath work also called alternate-nostril breathing. In this type of breathwork, you close off one side of the nose and breathe through the other, then switch back and forth for as long as needed to produce a relaxing effect that aligns the energies as well. So what does that have to do with putting your knee in your arm pit? Follow me here. Most of the time, you are breathing out of only one side of your nose, or 80% out of one side. And about once an hour, it switches sides quite automatically. No, really! Test it. Hold your cell phone (or a mirror) under your nose and breath out, fogging up the surface. One side of your nose is moving more air than the other. Now hold on for this fascinating fact: when you lunge down and put the front knee in your arm pit, it causes you to breath primarily out of the opposite nostril. Now you want to try it, don’t you?
With every round of Surya Namaskar, you lunge on each side, front knee in the arm pit, effectively making a form of alternate-nostril breathing part of very round. No wonder this sequence is so relaxing and energizing at the same time. By working the body and the breath, you then open up the energies. The postures in this sequence align the energy channels of the body in a way that clears and opens the chakras and meridians (look those up if they are not familiar). It’s a workout for the body, breath, mind, energy and soul.
But if that was not enough to convince you to include this sequence in your life every single day, let’s run down the list of major benefits that I experienced personally.
Calorie Burn
This was by far the biggest surprise for me in this sequence. What a gift! For the average 150 pound adult, each round of Surya Namaskar burns 13.9 calories. If you have more mass to move, you will burn more. If you are smaller, you will burn less. Therefore, for the average adult, a set of 10 Surya Namaskars will burn 139 calories. That is the equivalent of running about 1.3 miles at a moderate pace. Nice! Now factor in that you can do those 10 rounds in 5 minutes, while still maintaining good form and avoiding injury. That’s 139 calories in 5 minutes. You can do 30 rounds in 15 minutes and burn 417 calories. Surya Namaskar burns the equivalent of 1,668 calories per hour (that would be a whopping 120 rounds). That is a calorie burn rate that is more than twice what a hard run burns in the same hour. That means, this humble and foundational yoga sequence is quite measurably the best calorie burning exercise you can do, by more than twice over anything else. The reality is, however, that while you might manage to run for an hour and burn about 800 calories, most people will fall over exhausted far before completing 120 rounds of Surya Namaskar for 1668 calories. That being said, you can back off on the number of rounds and enjoy that same 800 calorie burn by doing just 60 rounds in 30 minutes. So you can burn more, or save time. Your choice. One sneaky way to do more rounds is to fit in a five minute set of 10 rounds once per hour, or at some interval, throughout your day. That can look a bit awkward at the office, but the point is to get creative. I am currently doing 108 rounds each day, for two days, and then taking a day off, rinse and repeat.
Workout Recovery
Surya Namaskar is also excellent for workout recovery. For the fitness enthusiasts out there, this sequence offers a form of active stretching and fascia release that speeds workout recovery from your main workout, whether that is running, weightlifting or other activities. Sometimes you might feel tightness in what you think are your muscles after a good workout, but it is actually tightness and/or misalignment in the fascia (the fibrous casings surrounding the muscles). Yoga is excellent at aligning these fibers and relaxing the fascia as well as stretching the muscles and ligaments. This sequence is a workout and a recovery all in one. Just 15 minutes of Surya Namaskar (30 rounds) at the end of your normal workout is a great way to stretch, workout any issues in the fascia and recover for the next workout. More workout, less suffering.
Proprioception
Proprioception is your innate ability to know where you are in space. In other words, it is your mind’s image of where your hands and feet and arms and legs and torso and head are and what they are doing in relation to everything else around you. Yoga in general, and this sequence in particular, vastly improve your proprioception. This helps with any number of other athletic skills, and with helping you simply not bump into things, or fall down. You can see the obvious implications for serious athletes, the elderly, and even for kids as their bodies are growing. Better understanding of where your body is and what it is doing is helpful for everyone. It builds confidence in your movement and I found myself more cognizant of my posture, walking form and overall movement.
Balancing The Left And Right Sides
Human bodies are organic objects. They have differences between the left and right sides. For example, most people have one leg that is strong and one that is smart. That is, one leg is better with intricate movements and one is more stable. If I ask you to stand on one foot, you will be more stable on one side than on the other. You might also have slight differences in the lengths of arms and legs on the right and left sides. Really! You might also simply be more tense or more flexible in the muscles of one side of the torso. Yoga in general, and this sequence in particular, helps to balance that out. No, it cannot make your legs the exact same length, but it can help to balance out the flexibility in both sides, as well as how you naturally compensate for small differences in leg length when walking, etc. Being more balanced between the two sides of your body helps to prevent injury, and improves your performance in all other types of movement from walking to running, weightlifting to swimming and everything else. Another plus for the serious athletes but a boost for us all.
Clearing The Mind And Improving Focus
Keeping good form through each round and tracking how many rounds you have done forces you to focus intensely. This mindful focus clears the mind of other thoughts, and trains the mind to focus, similarly to seated meditation. Where else in your life could you use a little more focus? I found myself more focused in everything else I did during the day, from work to conversations with my husband, to walking the dog. I was more in the moment and focused on the task at hand. That leads to better quality work, and higher quality relationships. And you thought this was just exercise. If you tend to have trouble sitting for meditation, try 30 rounds of this sequence, and then sit for meditation. You will find yourself much more able to focus. In fact, that was one of the major purposes of yoga to begin with – to wear out the body in preparation for meditation. So don’t let that improved ability to focus go to waste. Plan meditation, date night or deep work to follow your yoga time.
Precision Mindset
Surya Namaskar, as a sequence, must be done with precision, or you may injure yourself. Find a good video online to demonstrate the sequence. Approach your first few rounds slowly and precisely until you can move through a round with the precision of a robot, but the grace of a dancer. It’s a practice, not a perfect. Focus on making each round more precise than the last. This prevents injury from placing too much pressure on different parts of the spine, shoulders and knees. For the love of yoga, please practice slowly at first, and work your way up to speed only when you have precision. That being said, this focus on precision ends up affecting every other part of your life. Where could you use more precision? This is a boost for all your other athletic efforts, as well as your work, and even artistic efforts. You may find yourself more aware of the details of things, and this type of focus leads to more mindful days, and ultimately better results from whatever you do.
Open And Increase Energy
Yoga in general, and this sequence in particular, is excellent for opening and clearing the energy centers and channels in the body. I noticed this after about 27 rounds. At that point in the workout, I often notice energy surging through the spine. By the time I get to about 50-60 rounds, my entire body is surging with free flowing energy that lasts all day. It feels wonderful and, despite the fact that my body is exhausted, my mind is clear and my energy is up and ready for whatever else I might have planned in the day.
What It Lacks – Heavy Lifting, Abs, And Twists
So, Surya Namaskar is damn near perfect. But I found that, for me personally, it is a great whole body workout if there is not a gym nearby, but to feel completely satisfied in my workouts, I needed to add three things: heavy lifting, abs, and twists. For me, heavy lifting is a joy. Surya Namaskar includes plenty of body weight strength training, but it’s not heavy enough for me personally. I add in leg press and kettlebell to get the heavier leg work that I enjoy. Next is abs. While the sequence includes planks, and balancing elements that work the abs, it’s not enough for me personally, so I add in some ab work at the end. Lastly, there are no twisting movements in this sequence. Not many people will care, but I do, so I ad in some twisting poses towards the end of the rounds to satisfy my desire for that kind of movement.
Give It A Try! Important Tips…
Given all the amazing properties of Surya Namaskar, it’s a wonder you are not on the mat right now trying it out. A few tips as you begin to add this foundational and time tested sequence into your workouts… First, start small. This sequence will kick your rear in the best possible way. Try a few rounds, up to 11. When you feel you can go farther, add a few more. Work your way up to more and more rounds as you like, depending on the benefits you personally are seeking. Next, keep it precise! Precision, precision, precision. Do not freaking rush this or you will get hurt. Do each movement with the focus and precision of someone defusing a bomb. OK, maybe that’s an exaggeration, but you get my point. Focus and do it right. Don’t throw your body into these movements. Make them controlled, strong and purposeful. Lastly, breathe. Focusing so intently, you might forget to breathe. Once you get the movements down, add in the breath. Breathe in with the first moment, out with the second, and so on. The poses in this sequence lend themselves nicely to either an inhale or an exhale. Look that up as you study this sequence for yourself. Now get out there and give it a try!